
Instructions
Installation and Setup
First before you get too deep into installing Ticket Auction Manager for an event, you should ask yourself a few questions regarding its setup. This will dictate how you should proceed.
- Will the volume justify having more than one person entering at one time? If yes, then you will want to setup either one of the computers to have tam-server as well as tam-client, or have a separate machine to run tam-server on.
- Will all of the volunteers know that the process needs to be running to be able to use tam-client? If No on this one, you will want to install tam-client as a systemd service by either using the install script in the .tar.gz build of your architecture, or by installing the .deb file on a Debian-based distro or the .rpm file on an RPM-compatible distro.
- Are you going to use a possibly insecure wifi connection? If Yes, you’ll want to enable TLS mode on your server daemon before proceeding to connect clients to it. This will take a few commands to do.
Your network setup should look a lot like the diagram below:
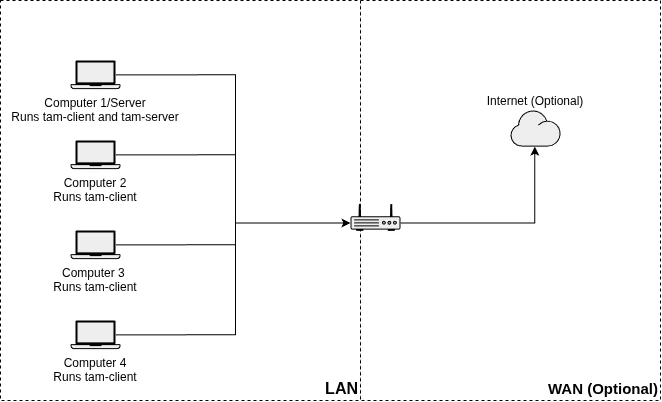
To explain it via text, you essentially want all of your TAM Clients on the same network or LAN as your TAM Server.
Installing the Server (If more than one client is needed)
From the Releases page, select the latest release. Then you can download the server daemon for your distribution if you have a Debian-based distribution or RPM-compatible distribution. If you don’t have a supported distro, as long as it’s using Systemd you can use the install script in the “portable” .tar.gz file.
Enabling TLS
As mentioned before if you’re going to be having tam-clients run on an insecure wifi network, you will want to enable TLS. If you’re running the tam-server daemon manually, via startup script, or via an unsupported launch system (if you’re doing this you probably already know what you’re doing), then you can just add " -tls" to the end of the command as an argument, if you’re specifying a custom addr, change the port to 8443 like “-addr :8443” in the line as well, and then restart/rerun the daemon, and it should now be in TLS mode.
For the Systemd services you’ll want to edit the ExecStart parameter, daemon-reload, then restart the tam-server service. Start with the following command:
sudo systemctl edit tam-server.service
It should then open your default text editor to edit a modification file, this is so that it will stay in place when updated by the package manger. In the space above the line that says: “### Edits below this comment will be discarded.”, add the following:
[Service]
ExecStart=
ExecStart=/usr/bin/tam-server -addr :8443 -tls -tray=false
If you’ve installed from the script in the “Portable” version, you may have to change the “/usr/bin/tam-server” to “/usr/local/bin/tam-server” instead. Rest should be the same.
For distros which don’t use standard paths for binaries, you can use the “command -v tam-server” to see where the tam-server executable is.
After changing the service you will have to do a daemon-reload and restart the service.
sudo systemctl daemon-reload
sudo systemctl restart tam-server.service
Setting Admin Password
In a web browser, go to http://ip_to_server:8000/admin or https://ip_to_server:8443/admin if you’ve enabled TLS. For the latter it may say that it’s insecure and you may have to click Advanced, and Proceed anyway, or similar language depending on your web browser.
Once your through, it should prompt you to set and confirm your password. Keep said password in a safe place, because that is how you will access the admin panel if needed and it is used to pair clients to the server.
Installing Clients
For each computer you have entering data you’ll need to install a client to do so. Each client keeps a copy of the data entered on that client so if you have an issue with the server, you can install the tam-server daemon on another one then push each client’s data back onto it.
You have options for running Ticket Auction Manager on the client side:
- Running portably: You can download the tam-client .tar.gz file for your architecture, extract it out of a directory you want to store it in, then double click on it and click Execute or Run (or similar terminology depending on distro and DE). It should run the TAM Client and open your default web browser.
- Installing DEB or RPM file: You can download either the .deb file or .rpm file, then use your distro’s package manager to install the .deb file or .rpm file for your distro, which should be within a release page that’s posted on the
Releases
page. For Debian-based or RPM-compatible distros with complete Desktop Environments (Gnome, KDE, Cinnamon, etc), you should be able to double-click the .deb or .rpm file, then click install.
- For most Debian-based distros you can use “dpkg -i tam-client….deb” to install the client, while in the directory with the file.
- For most RHEL or Fedora based distros you can install it with “dnf install ./tam-client….rpm”, while in the directory with the file.
- Using install.sh: Download and extract the tam-client .tar.gz file for your architecture, and run the install.sh script (may have to preceed it with “sudo " depending on environment). This should install it.
Setting Client Options
There are various client options you can set to network them via a tam-server instance or to adjust your venue name, default contact preference, or disable main menu attributions.
On the main menu you can press and hold Alt, then press A with Alt held down (in other words “Alt + A” combination). This will toggle the Admin mode features. In the future I may introduce the ability to password protect this but for now, this has been safe enough in practice.
Then the Settings button should bring you into settings.
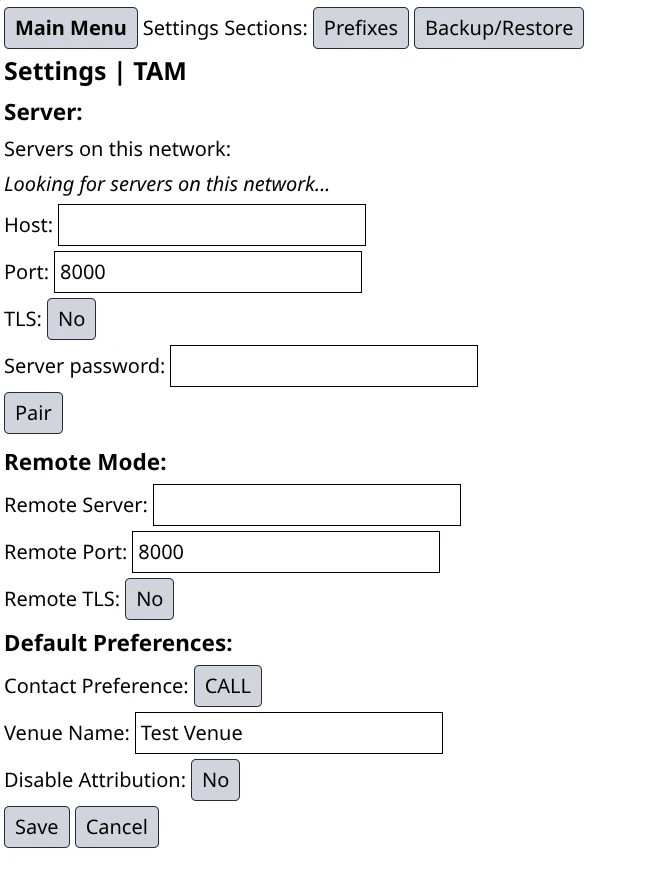
Creating Prefixes
At the top of the Settings menu, there’s a button that says “Prefixes.”
Once your networking is setup (if applicable) then you can click Prefixes and add the Prefixes you desire or need for your event.
Prefixes are essentially a set of ticket and item/basket type that matches together to form a unique identification of each ticket or item/basket. So if you have overlapping numbers between two different prefixes, then it doesn’t matter as they won’t overwrite or be confused for each other.
The prefix creation is pretty straightforward. You type in what you want the prefix name to be, then select what color you want the buttons to show up as when that prefix is selected, then set the weight. The weight determines sorting priority. The higher the number the lower the priority.
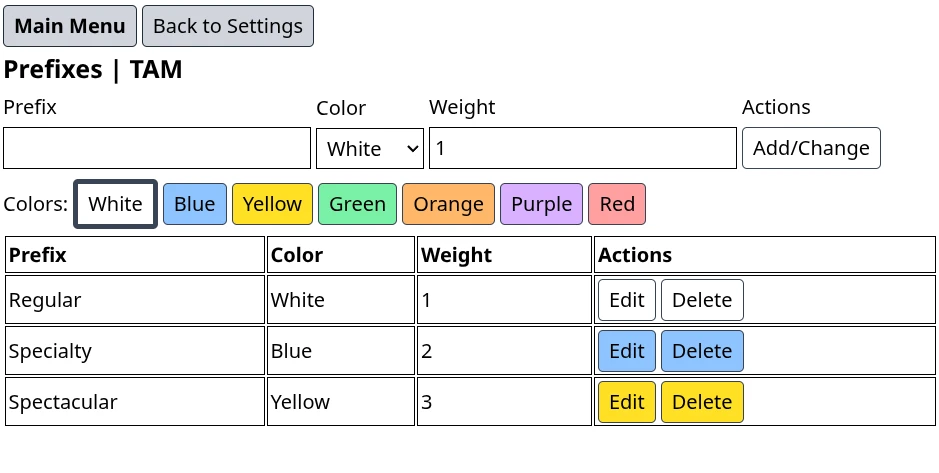
Because the primary identification of tickets and items/baskets depends on the uniqueness of prefixes, only one prefix can bear the same name. Attempting to create another prefix with the same name will overwrite it with a new color and weight assignment.
Entering Information
Now you’re off to the races to enter information.
The links to the forms show up on the main menu after you select a Prefix. Prefix selection is enforced at this point to keep people from confusing which prefix they’re already in with the one they’re supposed to go in.
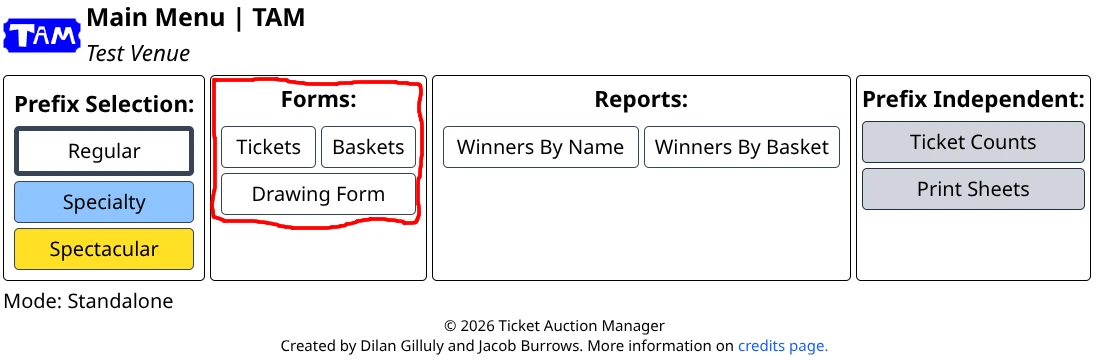
This is where most volunteer actions will happen.
Forms:
- Tickets: Buyer information per ticket number. This I find is where we’re spending 99% of our time during the SPCA Theme Basket Auction. Entries go by ticket number for the first and last number at the top.
- Baskets: Description and donors per Basket/item number. This is used for entering description and donor information for each basket. Description shows up on reports.
- Drawing: Once you draw for each Basket/item, you can enter it in here. Entries go by basket number for the first and last number at the top.
Other than being for different purposes each form follows a similar design, button placement, and even shortcut keys.
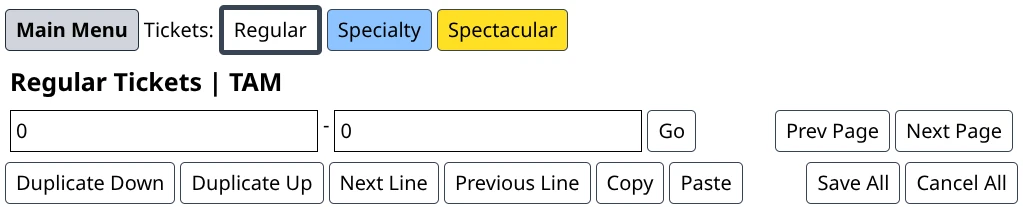
To reinforce being in the right prefix, the prefix is highlighted by a thicker border around it as the top, as you can see in the above screenshot.
First and last number of the page should be entered in at the top. Clicking Go populates the form with existing or a new item for each entry, depending on if it already exists or not.
Functions are as follows:
- Duplicate Down/Up (Alt + J, Alt + U; respectively): Copies a row to the next (Down) or previous (Up) row.
- Next/Previous Line (Alt + L, Alt + O; respectively): Goes to the next or previous row.
- Copy (Alt + C): Copies the row into the browser’s buffer.
- Paste (Alt + V): Pastes the buffer row into your current row.
- Save All (Alt + S): Saves all changed rows.
- Cancel All (No shortcut): Cancels all changed rows.
- Save (No shortcut): Saves row button is in.
- Cancel (No shortcut): Cancels row button is in.
Generating Reports
Creating reports with Ticket Auction Manager is much easier than many spreadsheet based ways of doing it.
It can be accomplished by clicking the the report that you need, with a prefix selected:
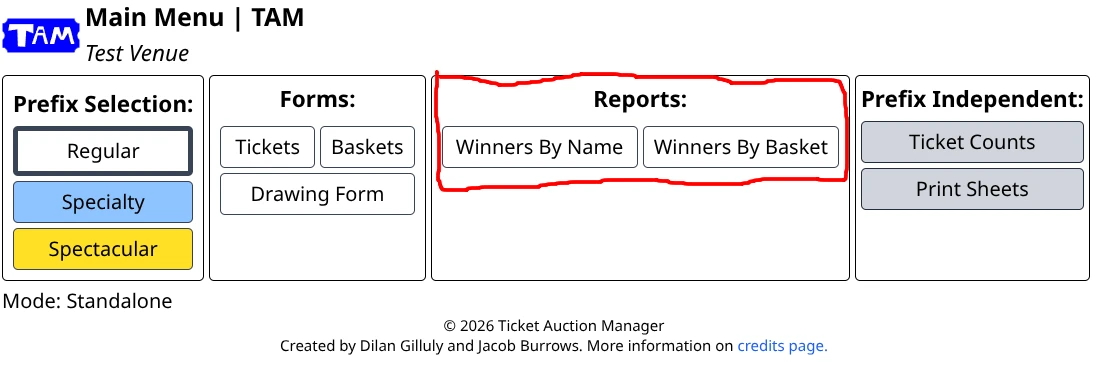
Reports:
- Winners By Name: Subset of reports sorted by “Last, First” name, phone number, then basket number.
- Winners By Basket: Subset of reports sorted by basket number.
Each report can be adjusted at the top for contact preference of the winners.
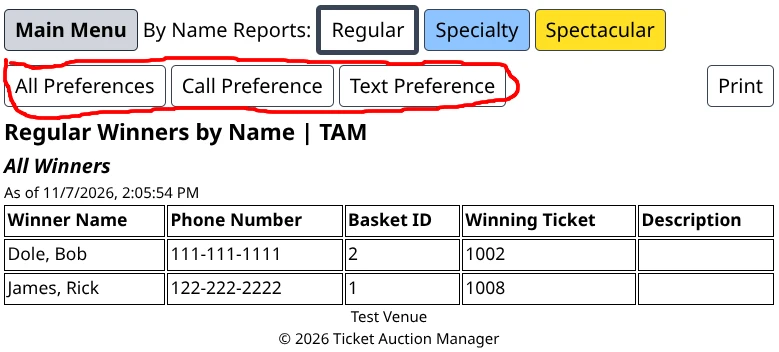
Printing can be done by clicking Print or pressing Ctrl + P combo.
Printer setup is dependent on OS and printer model. Please refer to your printer manufacturer’s documentation regarding installation on your OS.
Backup and restore
Backing up and restoring can be done within the client in Main Menu -> Admin Mode (Alt + A) -> Settings -> Backup/Restore.
If you’ve used backup/restore functions of other sites this should be pretty familiar to you.
Resetting for another event
Backup your data first, this will remove it from the primary service.
- Portable: Stop the pertaining service, for the client you can just Alt + A at the main menu and click the red button, then click Okay. That should stop the service. For the server, if the tray is running, you can stop it from there. If not, you can use a command like pkill or killall to stop the tam-server running in the background. Then delete the ‘data’ folder which is in with the portable executable files.
- Installed: Stop the pertaining service using systemd or your custom configured run system service (for others). For Systemd, you can use the command “sudo systemctl stop tam-server” and/or “sudo systemctl stop tam-client” to stop the service. Delete the “/var/lib/tam-server” or “/var/lib/tam-client” folder, you can do so using the “sudo rm -r /var/lib/tam-server” and/or “sudo rm -r /var/lib/tam-client” command.
Then you can start the services again by either rebooting, reopening, or running the commands “sudo systemctl start tam-server” or “sudo systemctl start tam-client”.
After a reset you do have to setup your network connections and preferences again.